tooninoz
Well-Known Member
- Joined
- Feb 26, 2008
- Messages
- 823
- Reaction score
- 0
Last year I did this thread...figured it wasn't being seen after so long and deleted all the pics from Photobucket. Now I'm getting PMed regularly. So, here we go again, but new and updated info and pics.
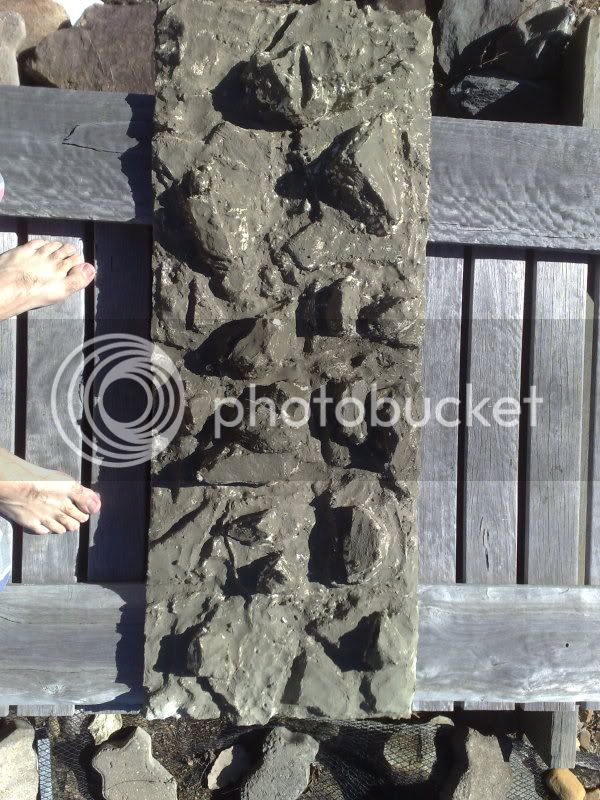
1. You'll need polystyrene to start with. I got a huge slab of polystyrene from a mate who is a brickie. Its 2.4m x 1.2m x 180mm thick. They use it once as a support for bricking archways and then it's thrown out.
If you go to a supplier (like Clarks etc), you'll find that polystyrene is expensive. My suggestion would be to visit building sites when they are pouring house slabs. You'll generally find excess waffle pods and you should be able to get a few. They'll do the trick as well.
In the pic below, you can see that it's a nice square block of foam; this is crucial as you don't want gaps under/behind the wall for obvious reasons.

Ive cut a chunk out and cut that down the middle to give me two pieces 90mm thick. These are only demo pieces for a display, so you'll have to cut the ones you need to the appropriate size.
2. Once you have your piece;

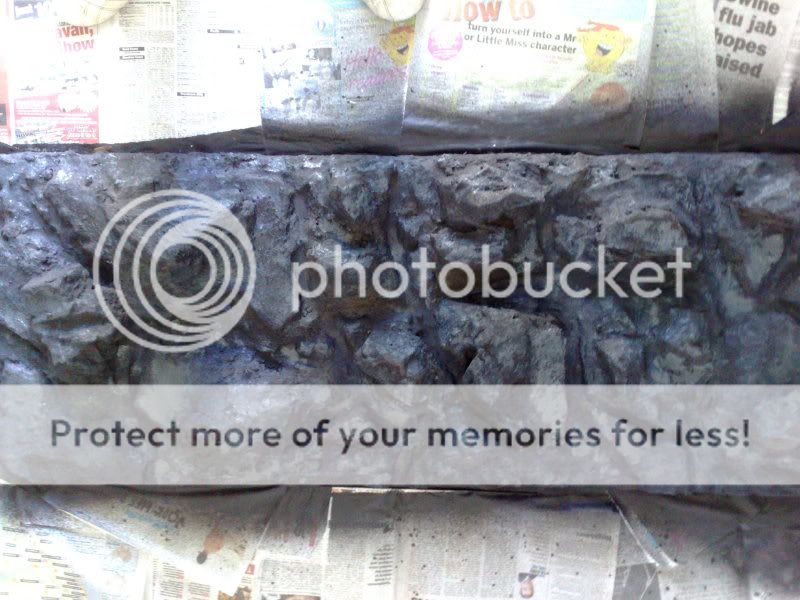
start to shape it. Ive just ripped chunks out with my fingers, shaped it with a rasp and given it a reasonably 'rocky' shape. Worth taking into consideration - whatever you rip out (crevices and rifts etc) will end up a lot less deep/sharp in the end given that it will have 4 coats of mortar over it.
Once you have a basic shape that you are happy with, it's imperative that you seal the face. This kills off the loose surface that'll weaken your wall. You can buy a cheap butane torch (runs off the supplied cigarette lighter) from Bunnings tool section. It also helps the flat areas to look more realistic.
Showing the square back;

3. Time to render it. My suggestion is to forget about tile grout altogether. I experimented with it in the beginning and I'm not at all confident that it'd do the job. Not for snakes and certainly not for sharp-clawed lizards.
For this I am simply using a 1:1 mix of fine brickies sand and GP cement.
You should make a fairly liquid mix in a bucket, and, using a 2" cheapy brush, slop it on. Use your brush to stir the mix up frequently so you aren't just applying water!
The first coat will...well, it won't look like a coat! It'll look like a mess;

Let this coat dry right out. It'll be flakey and fragile. Thicken the next coat a little.

4. For the third coat, keep the same kind of consistency but add a good squirt of PVA (white) glue. Don't use Bondcrete - it's basically expensive PVA and it will do the same job in this case. It adds strength to the layer plus allows flexibility under stress from heat/cold etc. *No point in spending a fortune on the glue either (Aquadhere etc). Just pick up the cheap stuff from the dollar shops' craft section*

To get rid of the brush strokes, wait til the render has gone off a bit (lost its sheen), and, using the same brush partially loaded with water, gently dab at it. **Too much water and too heavy a hand will wash the cement out, weakening it substantially**
A 4th coat (following the same steps) should be enough to complete it.
5. Sealing. I use a mix of DTA grout sealer, PVA glue and water. You could easily get away with watered down PVA and use a couple of coats.
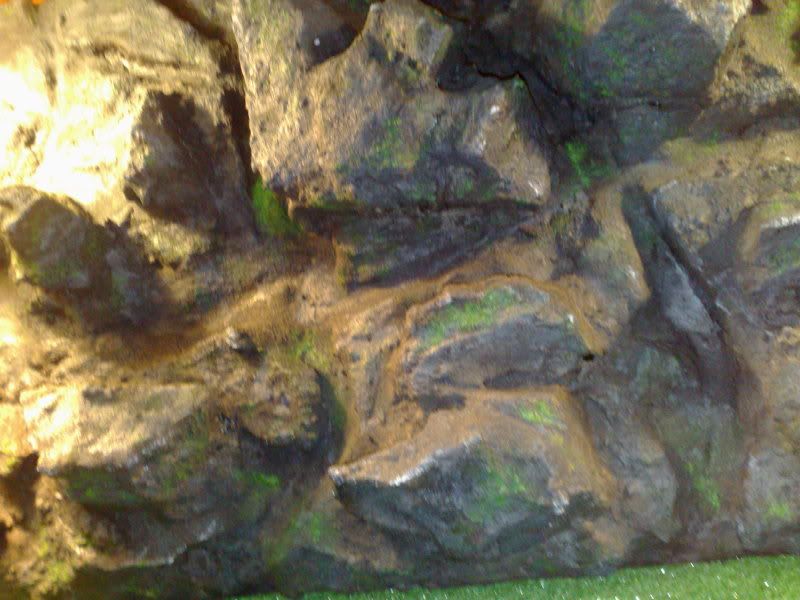
6. Painting. This is going to be down to personal taste! The cheap shops will have have the acrylic paints you need - Burnt Umber, Raw Sienna, Yellow and Red Oxides etc etc. All the earthy colours. Google some images to suit the locale of your reptile.
Here's a basecoat;

Experiment with brushes, sponge etc... this looks rubbish, but

The same method can be used to make hides and water-bowls
These are the hides used for my daughters Spotted hatchy for the past 7mths;


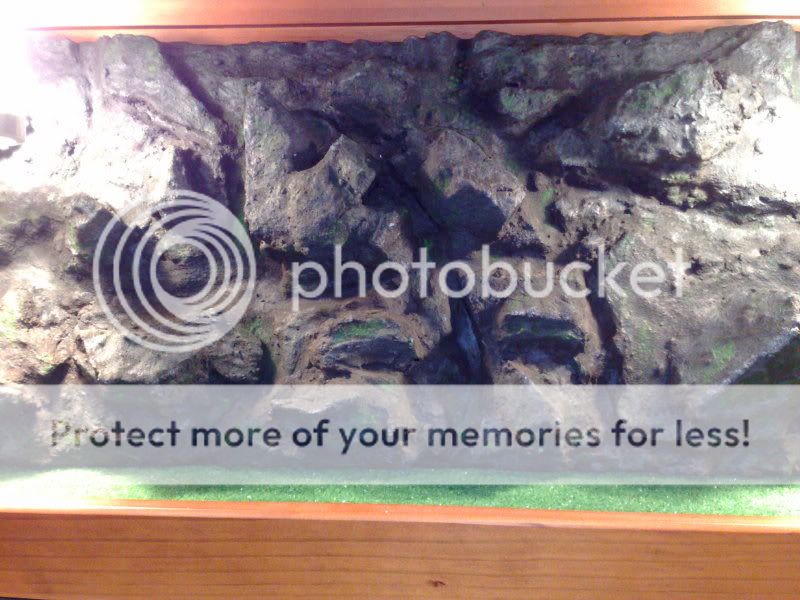
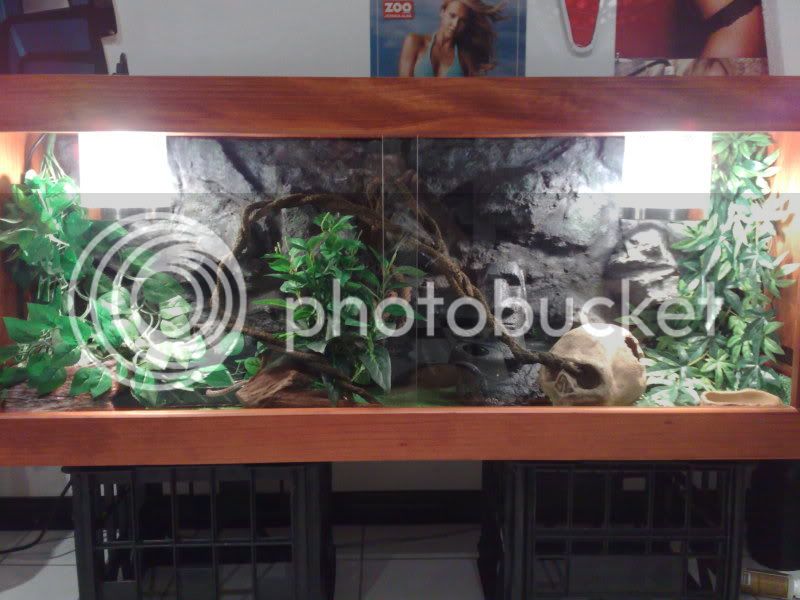
This is a corner piece display I'm part-way through. The photo is taken with one of the sides glued against a board so it looks askew!
This is a 3-piece, with a ledge etc.


I'll have some finished pics of the displays shortly.
If you need sand, or polystyrene and you're in Brisbane, let me know and I can help out.
cheers
1. You'll need polystyrene to start with. I got a huge slab of polystyrene from a mate who is a brickie. Its 2.4m x 1.2m x 180mm thick. They use it once as a support for bricking archways and then it's thrown out.
If you go to a supplier (like Clarks etc), you'll find that polystyrene is expensive. My suggestion would be to visit building sites when they are pouring house slabs. You'll generally find excess waffle pods and you should be able to get a few. They'll do the trick as well.
In the pic below, you can see that it's a nice square block of foam; this is crucial as you don't want gaps under/behind the wall for obvious reasons.
Ive cut a chunk out and cut that down the middle to give me two pieces 90mm thick. These are only demo pieces for a display, so you'll have to cut the ones you need to the appropriate size.
2. Once you have your piece;
start to shape it. Ive just ripped chunks out with my fingers, shaped it with a rasp and given it a reasonably 'rocky' shape. Worth taking into consideration - whatever you rip out (crevices and rifts etc) will end up a lot less deep/sharp in the end given that it will have 4 coats of mortar over it.
Once you have a basic shape that you are happy with, it's imperative that you seal the face. This kills off the loose surface that'll weaken your wall. You can buy a cheap butane torch (runs off the supplied cigarette lighter) from Bunnings tool section. It also helps the flat areas to look more realistic.
Showing the square back;
3. Time to render it. My suggestion is to forget about tile grout altogether. I experimented with it in the beginning and I'm not at all confident that it'd do the job. Not for snakes and certainly not for sharp-clawed lizards.
For this I am simply using a 1:1 mix of fine brickies sand and GP cement.
You should make a fairly liquid mix in a bucket, and, using a 2" cheapy brush, slop it on. Use your brush to stir the mix up frequently so you aren't just applying water!
The first coat will...well, it won't look like a coat! It'll look like a mess;
Let this coat dry right out. It'll be flakey and fragile. Thicken the next coat a little.
4. For the third coat, keep the same kind of consistency but add a good squirt of PVA (white) glue. Don't use Bondcrete - it's basically expensive PVA and it will do the same job in this case. It adds strength to the layer plus allows flexibility under stress from heat/cold etc. *No point in spending a fortune on the glue either (Aquadhere etc). Just pick up the cheap stuff from the dollar shops' craft section*
To get rid of the brush strokes, wait til the render has gone off a bit (lost its sheen), and, using the same brush partially loaded with water, gently dab at it. **Too much water and too heavy a hand will wash the cement out, weakening it substantially**
A 4th coat (following the same steps) should be enough to complete it.
5. Sealing. I use a mix of DTA grout sealer, PVA glue and water. You could easily get away with watered down PVA and use a couple of coats.
6. Painting. This is going to be down to personal taste! The cheap shops will have have the acrylic paints you need - Burnt Umber, Raw Sienna, Yellow and Red Oxides etc etc. All the earthy colours. Google some images to suit the locale of your reptile.
Here's a basecoat;
Experiment with brushes, sponge etc... this looks rubbish, but
The same method can be used to make hides and water-bowls
These are the hides used for my daughters Spotted hatchy for the past 7mths;
This is a corner piece display I'm part-way through. The photo is taken with one of the sides glued against a board so it looks askew!
This is a 3-piece, with a ledge etc.
I'll have some finished pics of the displays shortly.
If you need sand, or polystyrene and you're in Brisbane, let me know and I can help out.
cheers