Skippii
Well-Known Member
Hey guys
So as some of you know, I'm in the process of converting a TV cabinet into an enclosure. The whole project hit a bit of a stand-still over the last couple months, but I'm back into it now!
I wish I'd taken more pics up until this point just for funsies lol so I could look back at the whole process.. but I plan to start taking some now. At this point, not a whole lot has been done. I've installed a radiant heat panel in one end (Still need to get a cage for it), two air vents (one at the hot end one at the cold), and I've sanded and given the inside a couple coats of clear varnish. Nothing too groundbreaking!
For the background, I've decided to go with an aged slightly crumbly looking brick wall. I've always loved the look of brick, and I think once I get the old brick wall going and add in a bunch of plants and some climbers if i can find any, I'll almost have a secret garden vibe (That's one direction I'm considering at the moment anyway). I'm still not quite decided on the brick colour, anyone want to chime in with some suggestions? I was initially thinking your average red brick, but there are definitely more out there to choose from.. There are different sandstone shades, whites, light greys, dark greys.. Guess it might end up being a bit of trial and error as far as finding the right colour.
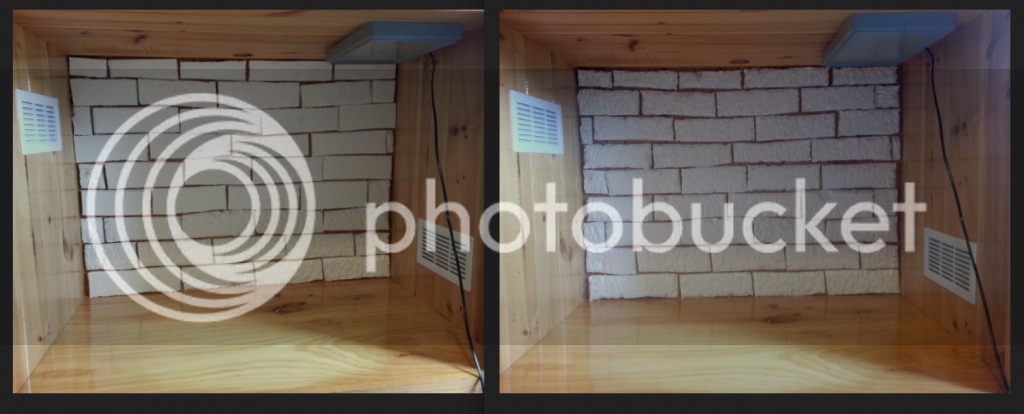
So far I've only gotten as far as cutting out some styrofoam "bricks", texturing them with a soldering iron (outside in the fresh air with a mask of course.. TONS of fumes! Also, there was a green ant situation that wasn't overly enjoyable..) and temporarily sticking them to the back wall with a small amount of sticky tape to see how they'll all fit together (As pictured). Just need to number them now so I know where each piece belongs haha much like a puzzle
(Sorry about the quality)
Obviously I'm still going to shave some edges off some and wiggle them all around to get them sitting right before gluing them to anything. This is just a basic layout.
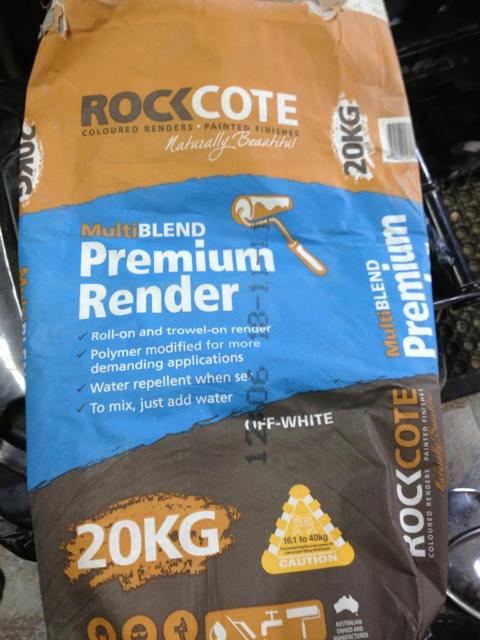
Can anyone tell me what kind of render I'm going to need? I vaguely remember seeing in another thread, someone had posted a picture of the render they currently had. I believe they mentioned something about render with acrylic, but I can't for the life of me find that post!
I'm also curious as to some paint brands or types people have been using, though that's not a huge worry. There's a lovely little art supply store in Cessnock where I'm sure I'll find what I need.
Then there's the issue with the sealant. I've heard of too many peoples' lovely backgrounds ending up with an almost blindingly shiny finish. Are there any sealants out there that aren't going to do that? I think I'd cry haha. I have heard it's good to sprinkle a little sand into some of the coats of sealant, does that help significantly?
Ta guys, any help would be HUGELY appreciated. I love creative projects like this, but when it comes down to finding the right render or sealant? Yeah, not my strong-suit lol I have no experience here whatsoever.
x
So as some of you know, I'm in the process of converting a TV cabinet into an enclosure. The whole project hit a bit of a stand-still over the last couple months, but I'm back into it now!
I wish I'd taken more pics up until this point just for funsies lol so I could look back at the whole process.. but I plan to start taking some now. At this point, not a whole lot has been done. I've installed a radiant heat panel in one end (Still need to get a cage for it), two air vents (one at the hot end one at the cold), and I've sanded and given the inside a couple coats of clear varnish. Nothing too groundbreaking!
For the background, I've decided to go with an aged slightly crumbly looking brick wall. I've always loved the look of brick, and I think once I get the old brick wall going and add in a bunch of plants and some climbers if i can find any, I'll almost have a secret garden vibe (That's one direction I'm considering at the moment anyway). I'm still not quite decided on the brick colour, anyone want to chime in with some suggestions? I was initially thinking your average red brick, but there are definitely more out there to choose from.. There are different sandstone shades, whites, light greys, dark greys.. Guess it might end up being a bit of trial and error as far as finding the right colour.
So far I've only gotten as far as cutting out some styrofoam "bricks", texturing them with a soldering iron (outside in the fresh air with a mask of course.. TONS of fumes! Also, there was a green ant situation that wasn't overly enjoyable..) and temporarily sticking them to the back wall with a small amount of sticky tape to see how they'll all fit together (As pictured). Just need to number them now so I know where each piece belongs haha much like a puzzle
(Sorry about the quality)
Obviously I'm still going to shave some edges off some and wiggle them all around to get them sitting right before gluing them to anything. This is just a basic layout.
Can anyone tell me what kind of render I'm going to need? I vaguely remember seeing in another thread, someone had posted a picture of the render they currently had. I believe they mentioned something about render with acrylic, but I can't for the life of me find that post!
I'm also curious as to some paint brands or types people have been using, though that's not a huge worry. There's a lovely little art supply store in Cessnock where I'm sure I'll find what I need.
Then there's the issue with the sealant. I've heard of too many peoples' lovely backgrounds ending up with an almost blindingly shiny finish. Are there any sealants out there that aren't going to do that? I think I'd cry haha. I have heard it's good to sprinkle a little sand into some of the coats of sealant, does that help significantly?
Ta guys, any help would be HUGELY appreciated. I love creative projects like this, but when it comes down to finding the right render or sealant? Yeah, not my strong-suit lol I have no experience here whatsoever.
x
Last edited:
")