TV Cabinet Conversion - background... A lil help please?

Aussie Pythons & Snakes Forum

Help Support Aussie Pythons & Snakes Forum:

This site may earn a commission from merchant affiliate links, including eBay, Amazon, and others.
Status
Not open for further replies.
I got a 12V strip of car led's off ebay for 10bux. Didn't come with a power plug so I just found an old 12V phone charger that was pumping out about 1.06amps, wired them together and worked like a charm.

I'm not a sparky or nor do I recommend doing this if you don't know what your doing. Always get somebody who knows electricity to do your wiring.
 
Ahh you guys are awesome. Thanks a bunch for all the advice so far, I'll definitely be using a lot of it.

So as promised, I've got a couple new pics. Nothing overly thrilling, just a couple quick progress shots (spent quite a chunk of today mowing the grass and recovering from a silly spider bite, that'll learn me to wear little ballet flats while mowing! Still, got some of the background done earlier).

Alright, basically what I've done is trace around the "bricks" I wanted to extend onto some more styrofoam sheeting. Then I cut the pieces out and scribbled on the backs where each piece went on the wall so I knew which piece belonged with which and how many pieces were going to make up that brick. The further i wanted the brick to pop out, the more layers i traced and cut out.

Screenshot2013-02-17at75248PM_zpsbdc3797f.png


I then went outside with all the cut up pieces (didn't want to cut the styrofoam outside, those fun little pieces of "snow" are incredibly bad for the environment, especially when they end up in the ocean.. So I made a mess inside instead!) matched them up with each other and glued all the pieces together. They looked pretty rough at this point, but I fixed them up a bit with a soldering iron.

Screenshot2013-02-17at75238PM_zps76075512.png


Once I'd fixed up the edges with the soldering iron, it was back inside to sticky tape them all onto the back wall of the enclosure again to see how they all look. I stuck them on very roughly, so some of them look a little skewed, but I'll get them sitting better when I eventually glue them onto the backing.

Screenshot2013-02-17at72024PM_zpsd8052fd4.png


I cannot wait to have this all finished haha, it's definitely more of an undertaking than I was expecting it to be! I'm sure it'll be rewarding at the end though :D

x
 
If you search aquarium led light strips on eBay there are lots that come with plug packs ready to go. And in different colors.
 
If you know someone with a soldering iron, Jaycar have some good setups as well. All I had to do was solder a plug onto the LEDtail plug lead and it runs off a 12v plug pack. Took me about 2 mins to solder up and there is no danger like when you try to wire up 240v stuff. In this case it either works or you soldered it the wrong way around and need to unsolder and reverse what you did.
 
We've got 2 soldering irons lol one for soldering, and one for melting plastic/styrofoam/other art projects. I'll definitely check out Jaycar and consider giving this a go! Cheers Gruni

x
 
Alright guys, no progress pics just yet, I've been fighting off a nasty infection for almost the last week, and still busy with work. So not a whole lot has happened with the background.

Today I decided I'm feeling well enough to hop up and do a little work on it. I also decided that since the cabinet has an incredibly inconveniently sized lip on the top and sides of the front opening, there was no was no way I could make a background the size of the back wall and fit in through the opening. So I've made the choice to build the background directly onto the back wall. May or may not be ideal, but it's what I'm going to do, if nothing else it'll be a learning curve.

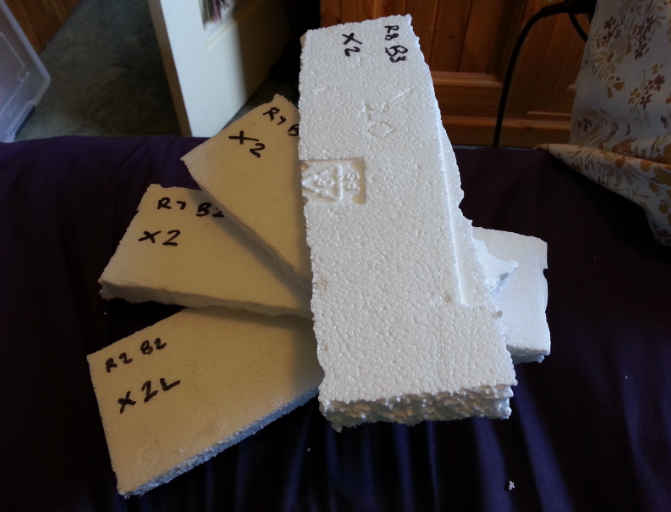
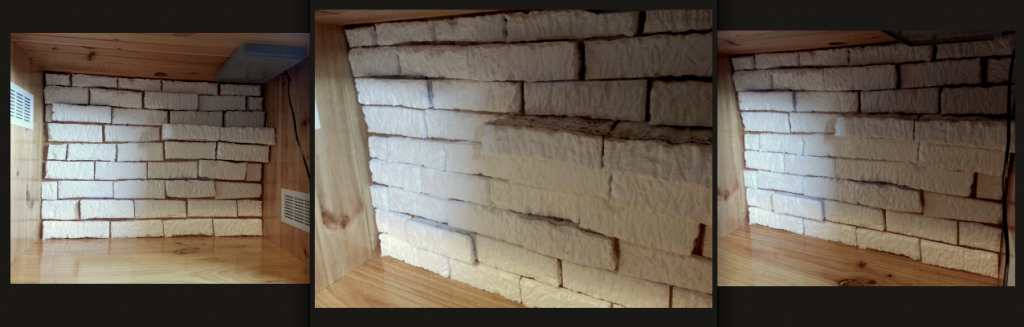
What I've done today is I removed all of the styro-bricks, sanded the back wall up a little to give it a rougher surface for the glue to stick to. I then stuck all of the bricks back onto the back wall with little pieces of sticky tape and wiggled them into place to where I was happy enough with them.

I then went along, row by row, taking off one brick at a time, removing the pieces of tape, dabbing on some liquid-nails style glue and re-placing them where they belonged. (Note: after pressing each glued brick into place, I then pulled it away again allowing oxygen to get into the glue, before pressing it back onto the wall. I've heard this helps the curing process)

haha I'm sure there's probably a more efficient method of getting the wall glued into place than what I've done, but it's worked for me!

So that's where I'm up to now, which is why I'm not posting any progress shots today: It looks much the same as when you saw them last, the tape has just been replaced with glue!

I will be posting up a couple pictures showing the glue I've used, as well as the render and sealant I bought from bunnings. I've not yet got the paints, but I'm hoping to grab some at the end of the week and I'll throw up a picture of those as well. Seeing pictures with specific products has definitely been a help for me during the process so far, as I'm a very visual person. So maybe it'll help someone else that stumbles upon this thread.

One question I do have though.. I didn't even think of this until it was too late haha. Will my acrylic render (with added PVA glue in the first coat) stick to the thin wooden parts in between the bricks? I realise I likely should have put a thin sheet of styrofoam onto the back wall and stuck the bricks to that. If it's going to be an issue, I'll just have to go in between the gaps with something before rendering it, not a huge deal. I'm such a goof sometimes :rolleyes: Anyway, let me know.

Thanks again for all your help so far, guys! You've been invaluable. I'll keep you updated, and also throw up some pictures when I start rendering.

x
 
On my DIY rocks, hides and walls I used Dunlop acrylic render from bunnings. It was the cheapest they had and comes in a bright yellow packet making it pretty hard to miss. It was 20kg for around $17. As for sealer I used the crommelins clear non toxic pond sealer. I can't remember the price but I got a smallish tub and that did 4 layers on a 4x2x2 rock wall, 4 layers on multiple fake rock sort of things and 2 large hides with some still left over. Ditto the render.

I don't find the crommelins gives off too much shine so a light rub with some fine steel wool is all it needs.

Brick looks really good and a secret garden theme sounds excellent. Why didn't I think of that? :)


Did you get the sealer from bunnings as well??? :)
 
Just render what you can and then before you paint it buy some paintable sealer and paint over it when you paint the whole thing. Done
 
Also one thing I forgot if you sprinkle some sand on the sealer when its wet, that way when you paint it, it won't stand out
 
If your worried about anchoring the rock wall onto the wood get some screws and just screw them into the wood all over the wall. Make sure they aren't to long. When you render over the top the render will form around the screw heads and anchor the whole thing onto the wall really well. :)
 
Thanks for your responses guys :D

Just to clarify though, I'm not worried about the "bricks" not being stuck on strongly enough, this glue sticks like you wouldn't believe haha. What I'm concerned about is whether or not the render will stick to the wood well enough. I feel like I heard somewhere that it's not ideal to render over wood, because wood shrinks and expands depending on the moisture in the air and it can cause issues with the render. I'm not sure how accurate that is, but it makes me nervous. I really should have thought of it before I stuck everything down, but the goofball that I am, I went and forgot!

I'd like to work out a way to seal the wooden bits between the bricks before actually rendering over the whole thing. Can anyone shed some light on this?

Ta :)

x
 
Yea I meant use the screws to attach the render to the wood. I would worry about puttying anything over the wood. I attached my rock walls straight to wood and I have had no problems. :)
 
Alright :D guess we'll see how it goes then! For now I'm just waiting for the glue to cure properly before I put any render over anything. I work tomorrow and wednesday, so the earliest I can start rendering will be thursday. I'll keep you guys updated!

x
 
I hope you're feeling better skippii- I'm the worst patient I always want to jump up and do something only to set back my recovery so it takes longer to be back to normal

You're not thinking very clearly :)
The render on the timber will be fine, the temps won't cause enough flex to be of concern, 'paint' some straight pva onto the timber and it will stop it sucking the moisture out of the render to quickly.
Then use a thin coat of pva, water and render to "paint" the mortar. I've rendered straight on timber with no drama.
As a side note to Dutchys comment about sealing then painting… paint first … sealer goes on last . That way when you have to use a bit of elbow grease to remove smeared poo, you won't smear the paint :)

Take things slow until you're firing on all cylinders or you'll wind up making silly mistakes (done that)

Ahh thanks Jax, I can relax now haha. Honestly though, how is it that you know SO much about DIY projects.. I swear you should have your own TV show, I'd tune in!

I don't plan on doing any more on it until at least the end of the week, I've got work to worry about over the next couple days.. Not looking forward to it, as I'm still not quite 100%, but I can't afford to miss any days right now so I've got no choice but to go. Hopefully the infection doesn't decide to make a comeback.

I'll hop onto the PVA glue on thursday, and hopefully start rendering on the weekend.

Thanks again, you're a lifesaver

x
 
TV show ? Nah I've got a great face for radio.
I've been around a few years (cough cough) and made plenty of mistakes! I openly admit I'm no professional, and have a stubborn streak that won't let me be reliant on others to get something done ROFL
My best advice:
1: Ask questions
2: stalk you-tube (great for demystifying powertools)
3: read the manuals / instructions of anything you use
4: Be confident
5: be proud of you accomplishments, no matter how small. You now have a new skill

If all else fails call 1800- DIY GODMOTHER.

AND POST PICS !!!!
 
hey there mate! I use Tile grout on mine personally, you can get the little coloured bags from bunnings for about 6 bucks each, The instead of using a sealant i find after 4 coats or so of tile grout, just a basic acrylic paint seals it quite well! no shine, and best of all u can colour it how ever u like! ..start with your darker colours then slowly work up too the finishing 'dru brushing' and highliting to reall make them pop!..if you go to my profile and look at my pics, there's a pic of my last custom tank with 6 feet by two feet or fake rock / canyon wall..hope this helps! let me know how ya go =)

Harley.
 
Status
Not open for further replies.
Back
Top