


mad_at_arms
Very Well-Known Member
Ok, so I had a request for a bit of a how to in regards to the worm farm that I created from an old wheelie bin.
I figured I may as well share it with the forum.
Even if you are not into gardening it is still a great way to reduce the amount of waste that your household produces.
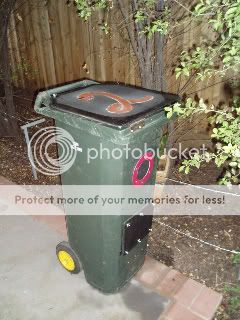
I used a 140L bin for mine, the lid was missing so I had make one up for it. This size bin in my experience works well for a household with 2-3 people. My idea was based on a product available from wormsdownunder.com.au
Things you will need:
Tools:
So the first thing I did was cut a hole for the inspection panel. Actually the first thing you want to do is make and fit a false bottom, but by cutting the inspection hole first it made it easier to access the inside of the bin.

Picture 1 -inspection panel
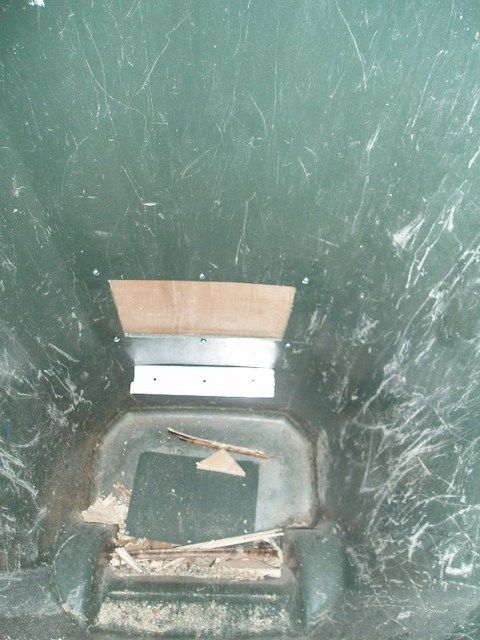
Picture 2 - false floor bracket
I've cut the inspection hole and mounted a bracket about 7-8cm below it. The false floor will sit on this bracket and on the section moulded for the wheel assembly.
The purpose of the false floor is to allow drainage of liquid castings produced as the little wriggler get to work.
The next thing to do is drill a hole for a drain plug in the lower section to drain out the liquid castings. I forgot to put one in until I had it all together which sucked.
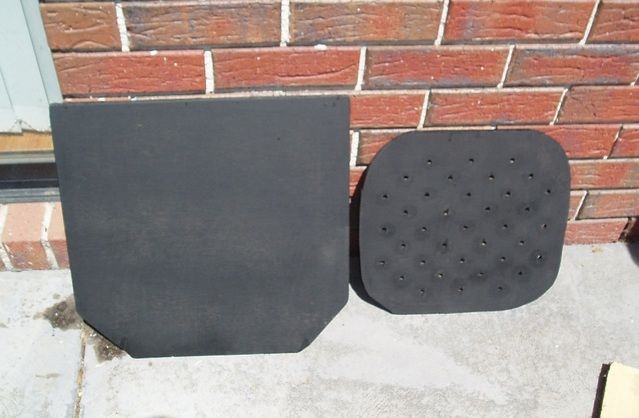
Picture 3 - lid and false bottom
I used plywood because it was available. I know that it will decay over time and I plan to replace it with some 5mm teflon sheet that I now have available. Note the holes drilled, allowing liquids to drain into the bottom area.
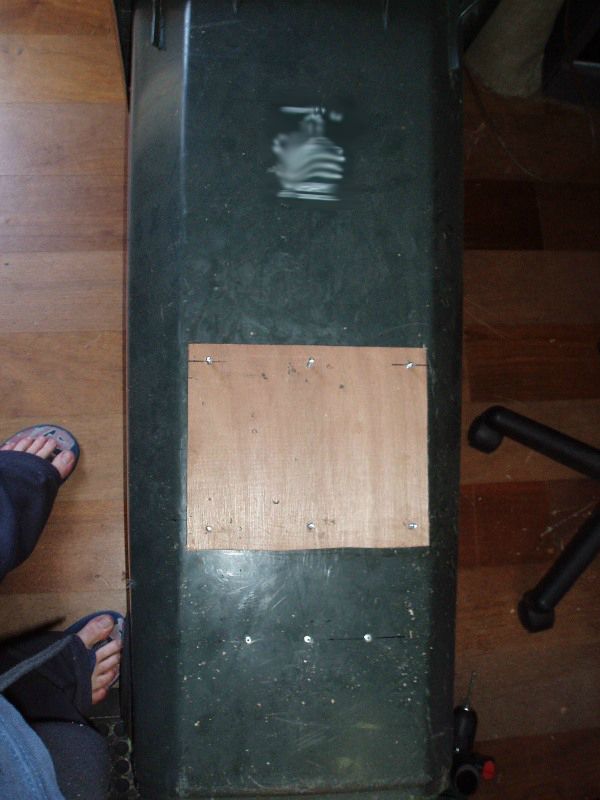
Picture 4 - fitted inspection panel
Inspection panel is held in place with wing nuts and bolts. I used normal nuts to hold the bolts in place.(see Pic1)
The inspection panel is to allow access to the worm castings (soil) without the need for emptying the whole bin to get to the good stuff at the bottom.
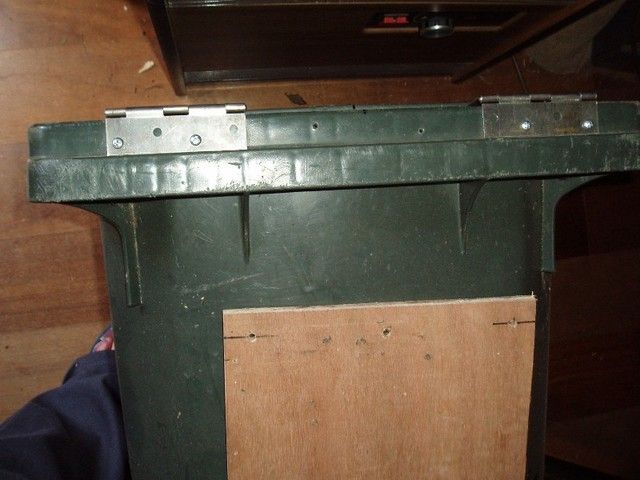
Picture 5 - hinges
I banged some hinges on for my lid. If you lucky your bin still has its original lid so you won't need to do this.
You may want to put a latch to secure the lid.
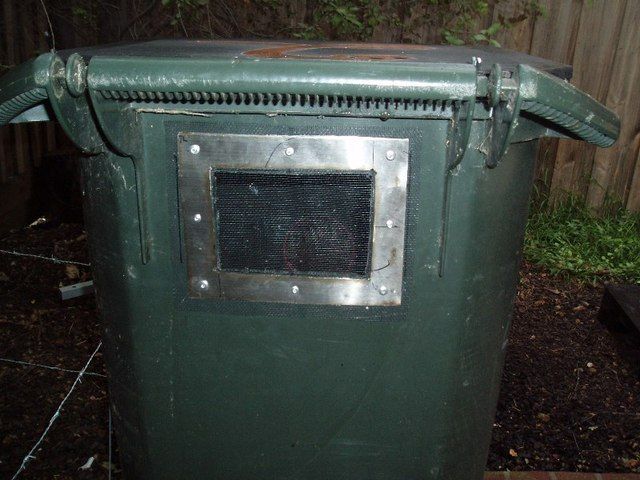
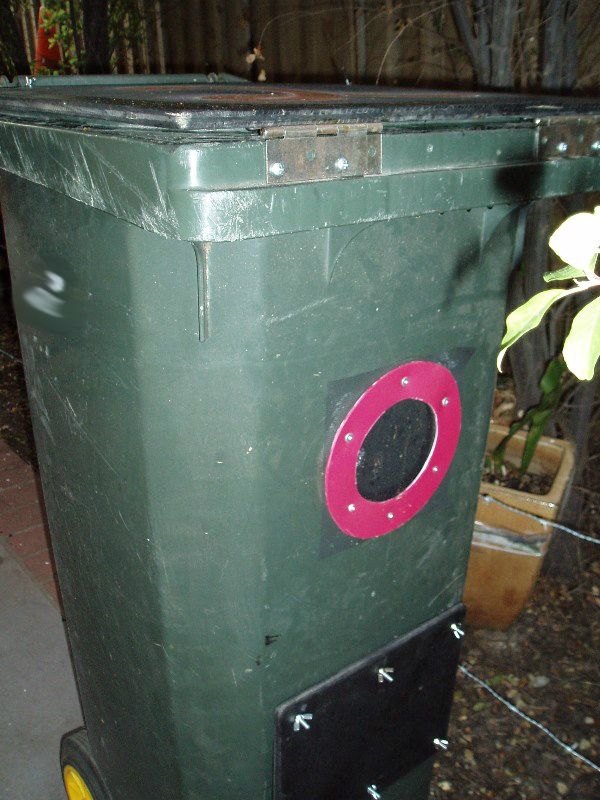
Picture 6 & 7- vents
To prevent mould and to help the breakdown process we need some ventilation. I put a vent in the front and rear of the bin. I have since replaced the nylon flyscreen with metal mesh after a possum ripped it open. I could have just drilled a series of hole in place of vents but the worms may climb out through them.
I put about 10L of soil in the bottom before adding ~1000 worms I bought locally and 500 eggs I ordered off kookaburrawormfarms.
Other points of interest.
In summer I keep mine in a shaded area, they like around 23C-26 from memory. A layer of straw or carpet on top
During winter I place it in the warmest spot in the back yard to try to keep them active. You may need to stop feeding them if the temperature is too low.
To extract soil without removing all your hard working worms, get a tarp and tip the contents out on to it. Put the good soil aside and then tip the rest back into the bin. Then sift the soil through 10mm mesh back on to the tarp.
Once done pile the soil up and wait 30mins or so. The worms will head down to the bottom of the pile away from the light so take a few inches off the top at a time. Reduce the pile to 30% or so and return the remaining soil (and worms) to the farm.
I do this once a year just before I start planting for spring.
Well that's about it.
Any questions?")
I figured I may as well share it with the forum.
Even if you are not into gardening it is still a great way to reduce the amount of waste that your household produces.
I used a 140L bin for mine, the lid was missing so I had make one up for it. This size bin in my experience works well for a household with 2-3 people. My idea was based on a product available from wormsdownunder.com.au
Things you will need:
- wheelie bin
- piece of plywood sheet
- flyscreen or mesh
- screws / rivets
- nuts and bolts
Tools:
- Drill
- Jigsaw or angle grinder
- Screwdriver / Pop riveter
So the first thing I did was cut a hole for the inspection panel. Actually the first thing you want to do is make and fit a false bottom, but by cutting the inspection hole first it made it easier to access the inside of the bin.
Picture 1 -inspection panel
Picture 2 - false floor bracket
I've cut the inspection hole and mounted a bracket about 7-8cm below it. The false floor will sit on this bracket and on the section moulded for the wheel assembly.
The purpose of the false floor is to allow drainage of liquid castings produced as the little wriggler get to work.
The next thing to do is drill a hole for a drain plug in the lower section to drain out the liquid castings. I forgot to put one in until I had it all together which sucked.
Picture 3 - lid and false bottom
I used plywood because it was available. I know that it will decay over time and I plan to replace it with some 5mm teflon sheet that I now have available. Note the holes drilled, allowing liquids to drain into the bottom area.
Picture 4 - fitted inspection panel
Inspection panel is held in place with wing nuts and bolts. I used normal nuts to hold the bolts in place.(see Pic1)
The inspection panel is to allow access to the worm castings (soil) without the need for emptying the whole bin to get to the good stuff at the bottom.
Picture 5 - hinges
I banged some hinges on for my lid. If you lucky your bin still has its original lid so you won't need to do this.
You may want to put a latch to secure the lid.
Picture 6 & 7- vents
To prevent mould and to help the breakdown process we need some ventilation. I put a vent in the front and rear of the bin. I have since replaced the nylon flyscreen with metal mesh after a possum ripped it open. I could have just drilled a series of hole in place of vents but the worms may climb out through them.
I put about 10L of soil in the bottom before adding ~1000 worms I bought locally and 500 eggs I ordered off kookaburrawormfarms.
Other points of interest.
- Make sure your lid fits tight. When it rains the worms will head to high ground even in the bin with no threat of drowning, so a good fitting lid will keep them in and also help keep unwanted pests out.
- There are some insects that can be welcomed such as the tiny flies that are attracted to ripe fruit. I have a small colony of woodies in mine now as a result of cleaning my insect tubs out into the worm farm.
- Worms will eat most fruit and veg scraps, but prefer some more than others. Avoid adding citrus peel and onion skins as the don't really like them.
- Woody plant material should not be added as the worms won't bother with it.
- Avoid adding mouldy stuff as some mould can kill worms.
- No meat scraps.
- Digging the scraps into the soil instead of just throwing them on top will encourage the worms to get into quicker.
- You can add a bit of vacuum dust, ashes and even hair every now and then.(Yes they eat hair!)
- Occasionally layer your scraps with straw mulch or shredded paper for aeration, turning the soil/scrap medium over will help also.
In summer I keep mine in a shaded area, they like around 23C-26 from memory. A layer of straw or carpet on top
During winter I place it in the warmest spot in the back yard to try to keep them active. You may need to stop feeding them if the temperature is too low.
To extract soil without removing all your hard working worms, get a tarp and tip the contents out on to it. Put the good soil aside and then tip the rest back into the bin. Then sift the soil through 10mm mesh back on to the tarp.
Once done pile the soil up and wait 30mins or so. The worms will head down to the bottom of the pile away from the light so take a few inches off the top at a time. Reduce the pile to 30% or so and return the remaining soil (and worms) to the farm.
I do this once a year just before I start planting for spring.
Well that's about it.
Any questions?