A few questions for all of the clever DIY-ers here.

Aussie Pythons & Snakes Forum

Help Support Aussie Pythons & Snakes Forum:

This site may earn a commission from merchant affiliate links, including eBay, Amazon, and others.
Status
Not open for further replies.
:) the only reason I suggested the oldest guy is they are often full of 'life experience' have lots of tips and tricks they happily share and know how important an accurate cut is. 'My bunnings guy' actually puts it up on the panel saw. Puts the 'fence' on, measures and marks both edges, then ***** it over to make sure it's still lined up with the saw just to check its been cut square at the timber yard. ! How good is that ! He's even rejected a couple of pieces and then set off with his giant set square to find a squarer piece !
Every piece I've bought from there has been spot on, I don't even double check it from him anymore.
I have a table saw but maneuvering full sheets on its small table is not a pleasant experience! If I win lotto a big block of land with an industrial size shed and a panel saw will be first on the list !
 
Your basic knowledge is a lot less than what's needed to build a secure environment for any reptile.

Jamie
it appears your basic knowledge is a lot less than whats needed mate.......there is a glue that is designed for malimine it sticks far stronger than PVA does to timber
 
Or, see if anyone is near you that has built them before. Ask if they might be willing to help. You can slap one together in a few hours. Buy pizza and and maybe a few adult beverages (or soda if that's their/your thing :D)

Sent from my SAMSUNG-SGH-I747 using Tapatalk 2
 
Thank you everyone for your help! It's very much appreciated. I'm currently in the midst of moving, after which I will have 5 days off a week :lol: Plenty of time to practice!

I have the basics like the jigsaw saw, a power drill, clamps, angle, level... Are there any stand out tools that would make my life much easier?
 
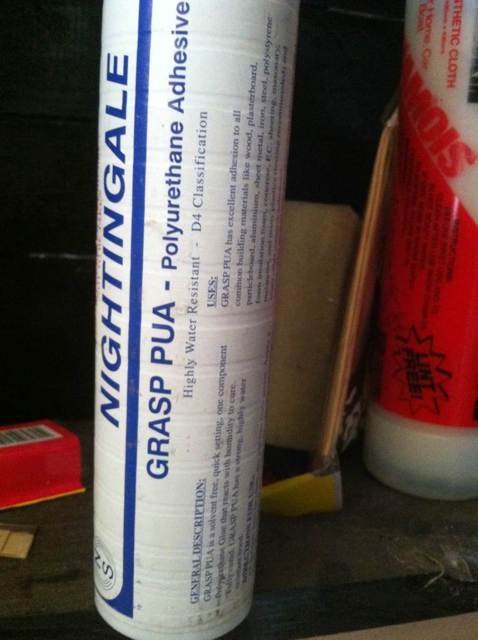
there is a glue that is designed for malimine it sticks far stronger than PVA does to timber

vu2e9eju.jpg
Sticks like excrement to a blanket when clamped whilst drying. Available from cabinetmakers. I get mine from the company that cuts to order for me (when I can afford to get stuff cut on their cnc machine) I get them to tongue and groove the panels so they slot into each other perfectly then glue and clamp together (they cut to 0.1mm and its computer and machine cut. Superior finish with no screws at all but cost extra bucks for tongue and groove, or i can get it cut so i screw it together)
 
Last edited:
You are getting great advise.

One thing you might consider is using something like google sketch to design your enclosure. This will help with getting all your measurements right.

Then there are the little things like raising the tracks so they dont fill up with substrate.

I had a ball doing my two bay display enclosure. It ended up costing far to much but I love the result.
 
Also if cutting with a circular saw its best to find out the off-set of the saw blade to the edge of the baseplate and clamp a straight edge (rigid piece of metal or a long enough level) and use this to keep the cut straight its a million times better than following a drawn line. Clamp on a test piece of wood then cut a sliver off it then measure from the straightedge to the cut. You will have to add or subtract that measurement from your final cut if you get what i mean. Remember it will be different when cutting on the other side of the blade.
gysy4upa.jpg

Also, cut depth. First unplug the saw so you dont accidentally turn it on and end up with no digits.
Set the depth of the blade so it only pokes out a few mm past the timber. There are two good reasons for this, firstly safety, it reduces the chance of "kick-back" which is where the saw bites into the wood instead of cutting it and the saw is kicked back and up. It can end really badly so beware. And dont push the saw forward too hard, the rotation of the blade will do the cutting not extra pressure on it, a slow cut also has less chipping.
7e2a8aty.jpg
Secondly it gives a much better cut by reducing the amount of chipping to the cut edge.
amu6age3.jpg
Im pointing to where you set the cut depth by adjusting the baseplate up or down

Oh and if you want cheap sheets to practice your cutting on ask if they have "cover sheets" of mdf or something else they are sometimes free or cheap as (if available)

Get a dust mask too. Some of the chemicals used to make these products arent good for you
 
Last edited:
vu2e9eju.jpg
Sticks like excrement to a blanket when clamped whilst drying. Available from cabinetmakers. I get mine from the company that cuts to order for me (when I can afford to get stuff cut on their cnc machine) I get them to tongue and groove the panels so they slot into each other perfectly then glue and clamp together (they cut to 0.1mm and its computer and machine cut. Superior finish with no screws at all but cost extra bucks for tongue and groove, or i can get it cut so i screw it together)
I was a cabinet maker for 10 years, that stuff is good, we also used a glue called AV56 I think it was that good stuff to, just looks like pva but designed for malimine.
 
I was a cabinet maker for 10 years, that stuff is good, we also used a glue called AV56 I think it was that good stuff to, just looks like pva but designed for malimine.

Important thing with using this is rubber gloves and also was told best way to clean up excess is to use a bog knife and slice it off once it has started to set but before it fully sets!
 
Just a note, perspex does 'cloud' and start looking a bit ratty after a while. ( used it for some of my enclosures about 3 years ago - I still have them, they're not so bad you can't see through but I will be sticking with glass from now on )
 
My advice is to see if there is a 'Men's Shed' close by where some of the guys might be willing to give you some advice/help with the project.

good luck, you are right there is nothing like the satisfaction of seeing your own design come to life at your own hands. I finished my first attempt a year ago and whilst it isn't perfect, the animals are happy.
 
I have the basics like the jigsaw saw, a power drill, clamps, angle, level... Are there any stand out tools that would make my life much easier?

A good plunge router will let you make all types of slots and recesses with just a little practice.
 
I have found complete DIY is really not the way to go. Enlisting the help of professionals to assist with design, cut, edging all of the timber required is cost effective (especially if you shop around, there are lots of small business' that will be happy to do small fill in jobs to keep there apprentice busy). Cabinet makers buy there products in larger quantities and also get larger trade discounts.

While I have the tools, the training and the skills to do all of this myself, its time consuming and difficult to get the finish you get with computer controlled machines worth thousands of dollars.

The tools required from that point onwards are then quite strait forward, taking your time to mark out and pre-drill screw holes, sealing exposed edges of sheeting before assembly, carefully marking out and installing vents and carefully planning the placement of the electrical components, will result in professional looking enclosures.

As and example of the above, I am currently building a three bay enclosure and to have all the material cut and edged, worked out a cheaper to have it all professionally done than to buy the basic material and do it myself, and obviously, a lot less time consuming. (Bunnings compared to cabinet maker).

I certainly encourage you to increase your knowledge and skill base and I like the good old Australian give it a go attitude, I do however wonder why we so often try to re-invent the wheel. There is a lot to be said for personal ambition and the feeling of accomplishment when you succeed in achieving what you set out to do, and if learning the skills to complete the task you have set yourself is important to you, then I would suggest learning the necessary skills from others who are suitably qualified.

A lot of power tools are potentially dangerous, and a lot of DIY enthusiasts are unaware of the risks. There are a lot of nasty chemicals in most manufactured timber products also and you need to make yourself aware of this and what steps you need to take to protect yourself.

The skills you gain from DIY projects often transfer directly to other things in your life, and from that point of view alone, I think its a worthy pursuit. I wish you well and every success in your projects.

Regards

Wing_Nut
 
A good plunge router will let you make all types of slots and recesses with just a little practice.

I actually prefer my trimmer router ( sometimes called a laminate trimmer) I can easily hold it in one hand. My plunge router has been nominated to be turned upside down and used on my not yet built router table :)
A good basic starting point for power tools
- a power drill or a cordless with 2 quick charge batteries
- a circular saw with fine tooth blade, higher the number the finer the cut. (Think steak knife vs bread knife- you would use a bread knife to cut steak! )
- a router

I have a full range, but I have a love hate relationship with my jigsaw.
If you do decide to use screws always pre drill your holes (go one size thinner than your screws) you won't split the wood.
ALWAYS mask up ALWAYS !!!
Tie back your hair and keep it out of your face! Otherwise it will fall right in front of your eyes at the worst possible time.
Always wear closed in shoes (doesn't have to be 'safety boots' but if you drop something, even a screw driver it hurts like you wouldn't believe when it spears into the top of your foot. It will also protect you if you stand on that dropped screw you forgot to pick up :)
Don't be scared of your tools but have respect for the damage they can cause to soft flesh if something goes wrong.
Above all enjoy the learning experience. You'll make mistakes at first, but I can guarantee you won't do it a second time- you'll make different mistakes and learn from them too.
 
Just be aware that you can't do it without a basic understanding of the materials you are using and the appropriate tools

Jamie

Which is exactly why Sarah's here asking questions; to gain the basic understanding necessary to take on the task.
 
Hello all,

The whole router thing makita make a new thing called a romer router i think its a laminated trimmer with vary speed way more grunt and can take bigger bits with an array of attachments and best of all its cheap. I think i paid $169.
I terms of tool quality truely means safety i have used countless cheap brand tools and have felt uneasy with the proformance and build quality. (also the overall outcome is way better). For connecting and sheet materials you cant go past a small guage nail gun eg 18ga or 16ga in straight brads.

For glue ya cant go past ultra set which is a flooring glue is glues everthing whilst remaining slightly flexable.

The Biggest thing i have learnt from all my carpentry and DIY days are i aint a mistake if no one notices and it still looks good. Plans can change as you build due to mistakes.

Ill post a diary of my new 100% custom made from scratch three high encolsure very soon. As its first inhabitances move in this long weekend.

Cheers Jacob
 
The makita Roumer router takes the 6.35mm bit, the same as my ryobi trimmer, The only difference is the bigger motor and variable speed - probably handy if you want to work with hardwoods but for pine/MDF mine does just fine and was half the price and BOY am I glad I bought it before they started producing the awful flouro green ones ..... Yuk!

Oh come on..... You all knew I had to check it out !!!!
 
Last edited:
Status
Not open for further replies.
Back
Top