Home made heat mats?

Aussie Pythons & Snakes Forum

Help Support Aussie Pythons & Snakes Forum:

This site may earn a commission from merchant affiliate links, including eBay, Amazon, and others.
Status
Not open for further replies.
Thanks for all the replies guys, I'm thinking of using it for a SWCP, if I mount it on the roof or side of the enclosure will I need a heat light or extra source of heat for the bottom as well?
 
That depends on the size of your enclosure, the layout, the size of the panel, the temps you are after and the temps of the room. I'm using mine as the only heat source in a large enclosure. He's tending to stay put in winter, but will be using more of the enclosure in summer. I've got a Habistat panel as the only heat source in a 1.2m high x 1m wide x .6m deep MD enclosure. It is sufficient. I don't see why you would need any more.
 
i really dont see an issue with using heat mats as long as they are on DIMMING thermostats.
 
There is a significant efficiency difference between using heat cord as a “heat mat” and as a “radiant panel”. When the heat cord gets hot it will give off some of its heat energy as infra-red radiation and give off some to whatever it is touching it by conduction.

Heat mat: By sandwiching the cord between an insulating lower surface and a conducting upper surface e.g. MDF board and ceramic or slate tile, respectively, very little heat is lost through the base and the heat entering the top layer spreads evenly throughout. A ‘cold’ reptile in contact with this surface will absorb the available heat at the points of contact. More heat will be quickly be conducted to those areas where it has been reduced, allowing continued uptake by the reptile until it reaches the same temperature as the top surface normally.

Radiant Heat Panel: This involves the cord being supported on a framework and positioned either vertically or horizontally against a wall/ceiling. The radiant energy coming out of the cord is going in 360o. Placing a reflective background behind it will help a lot – let’s assume all backwards directed radiation is now directed forward. The radiant energy now will be directed in 180o. At 10 cm from the face of the panel, approximately half the radiation being given off is still directly in front of the panel. At 20 cm that drops to about 40%. These figures are generous and represent full exposure of the cord to the front, with no guard to further reduce available radiation.

I would suggest that if you do wish to use heat cord as a radiant panel, then make sure you up the wattage compared to what you would use for a heat mat arrangement.

Arboreal pythons do like to bask and will often from the security of a tree refuge or a warm rock surface not far from cover. So I reckon they should have the choice. By providing a warm “bottom heat” spot down low and a radiant basking spot above suitably positioned branches. The bottom spot can be a globe in a box or a heat cord “mat” while the top spot can be warmed with an infra-red heat lamp (25 W or 50W) or ceramic heat emitter (75 W or…). The wattage required depends on a range of things related to how quickly your enclosure looses heat and from where. If the vents are not at the very top, then the warm air rising up from below may form a layer of trapped warm air in the top of the enclosure. Try heating the enclosure with an extension light, heater or whatever. Then monitor temperatures, top and bottom, for several hours and see what happens. That will give you a feel for what is required.

In case you are interested…

[FONT=&quot]An effective and efficient home-made heat cord “mat”[/FONT]

A 15 W heat cord, a ceramic or slate tile and a thin sheet of MDF particle board can utilised to produce an adjustable heat mat around 25cm2. If correctly set up, this heating method does not even require a thermostat.

The MDF is used as the base. Cut out a piece the same size as the tile to be used. Then, using a cross-cut saw or router, cut a series of channels into the wood, both length-ways and at right angles across it. The channels should be about every 2.5 cm apart and just large enough to press the heat cord into with a little room to spare.

The heat cord is placed into the channels in an arrangement of loops. NO loop should be closer than 5 cm to the next. Place the covering tile on top and allow the heat cord to run for at 2 to 3 days. Measure the air temperature about 5 mm above the centre of the tile and adjust the amount of heat cord under the tile accordingly. Allow sufficient time for the new temperature to stabilise and repeat. Continue to adjust the amount of cord threaded under the tile until the desired temperature is achieved and stable.

The heat cord can be fed in and out of the cage through a couple of small holes in the bottom edge or base. Depending on how much is used under the tile, the rest will simply hang out the back of the cage, where the heat can dissipate into the air. The MDF board can be coated with 4 coats of polyurethane, or similar resin, to make it water proof.

The tiles are heavy and not readily displaced, depending on the inhabitants. However, if you were to find this a problem, a dab of Blu-tack in each corner will hold it in place. The tile can also be held in place by thin wooden edging strips tacked to the MDF base.

I advocate using a tile for a number of reasons. They a fairly good conductors and this allows the heat to spread evenly throughout the tile. This means you don’t get hot spots developing around the cord, the surface temperature of the tile is even all over and the tile will continue conducting heat to a “cold” cold reptile on it, regardless of its position or change therein. Tiles are water proof and easily cleaned and sterilised.
Ceramic and slate come in a vast array of colours and surface finishes. You should be able to choose one that looks good in the given enclosure.

The size and shape of the “mat” can be altered by using more than one tile and/or cutting the tiles in half and rearranging into the desired shape. Cutting the MDF base out as one piece will provide the stability to hold cut tiles together.

Sorry – no pics.

Blue
 
One point l forgot to mention after reading "Bluetongue1"s post is that the heat cord in my homemade heat panel is 80 watts as l found any less wasn't up to it and l live in Brisbane....solar 17 (Baden)
 
We made a heat panel using two thin tiles and a heat cord. The cord was the 25watt one and 3 metres long. we put one tile on the bottom then wound the heat back and forth make sure each loop has a wide bend not tight otherwise you will damage the cord we did this for the whole tile then put another tile on top and did three strips of heat proof tape to hold the tiles all together we then put it in the corner and plugged in perfect sits around 28 degrees and have a thermometer and thermostat pushed in the side just to make sure, it leaves a small gap of less then 1cm all the way around for excess heat to escape so wont overheat and catch fire. my snake loves it as we put a small square of marine carpet and then her hide on top. happy snake:D will post pics in a second.
 
Last edited:
That tile idea sounds good, might give it a try. Ordering the heat cord tonight hopefully, got the container (last one in Kmart!!) borrowing a soldering iron on monday, license should come some time this week. It's all coming together :D :D :D
 
pictures:) sorry some of the pics are a bit dark miss grumpy was asleep in her hide and wouldnt get off her tile
 

Attachments

  • holly3 005.jpg
    holly3 005.jpg
    23.7 KB · Views: 67
  • holly3 006.jpg
    holly3 006.jpg
    25.9 KB · Views: 70
  • holly3 003.jpg
    holly3 003.jpg
    78.6 KB · Views: 67
How do you think it would go under a click clack? I don't wanna melt the plastic if the tiles get too hot, and I don't trust the normal heat mats.
 
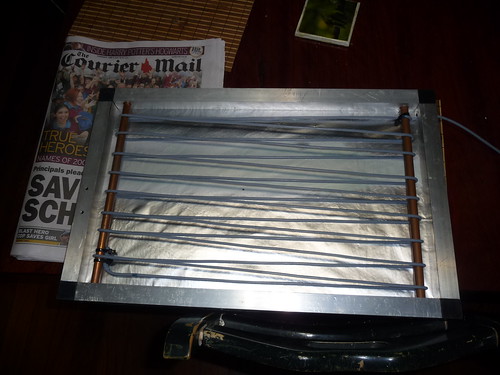
Hey Saximus, this is my heat panel that l make and it maybe what you were thinking of with aluminium foil behind but for the pic l have removed the mouse wire (6mm squares) covering.....solar 17 (Baden)
5814006145_6ce1542f24.jpg

Great idea baden , i am making 1 similar to the 1 you made , they only question is should i just fit it to the ceiling above the heat shelf , or would it be better under the shelf so it heats under it aswell as the shelf ? There is a light under the shelf at the moment that could be moved .

cheers nico
Hi Nico (imo) under the shelf so it can warm the shelf as well....Baden (solar 17)
 
Im trying to get a photo up of the enclosure im building , i have a light and cage under the shelf and a home made heat mat , the heat mat isnt heating the shelf enough so i am taking out the heat mat and using the panel instead . when i can get a photo up i will . How thick are your shelves Bayden ?
 
I used dickyknee's method to make a heat cord panel in a strangely-shaped cabinet conversion. Here are some pics.

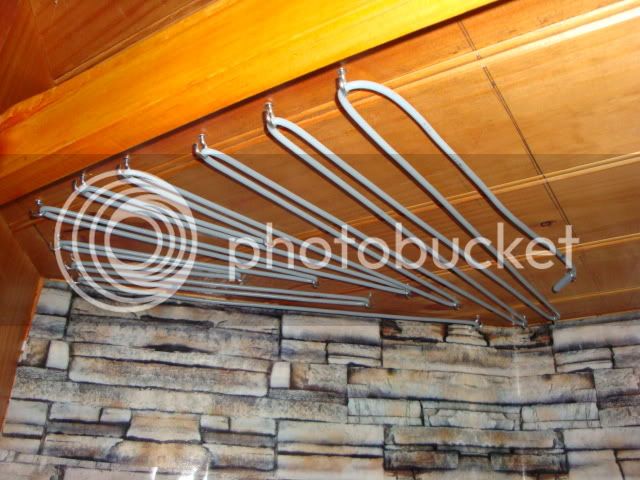
Step 1: put cup hooks in the roof of the enclosure where you want to put the heat cord.

Step 2: wind heat cord through the cup hooks
DSC03775.jpg

I would be concerned with the sharp bends in the cord , which over time are likely to perish and short through.

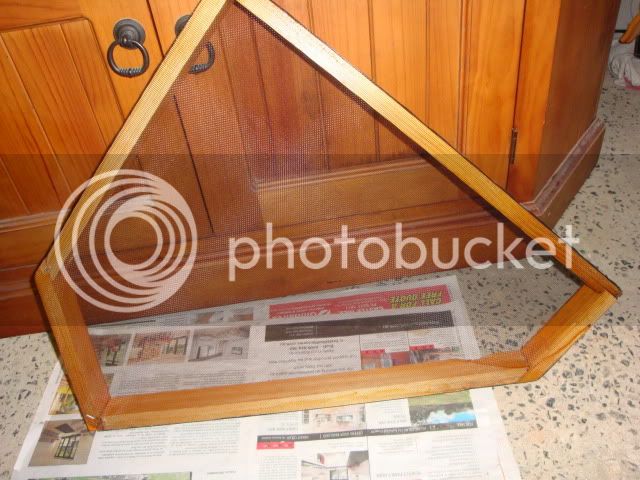
Step 3: Make a frame out of timber or the material of your choice and cover with aluminium flyscreen. (I stapled it on.)
DSC03777.jpg


Step 4: Screw the frame to the roof of the enclosure to protect the heat panel.
DSC03780.jpg


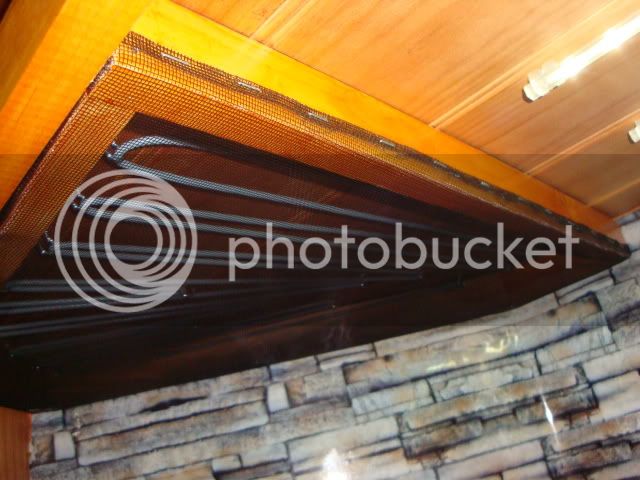
It's very simple and I'm using a 50W cord to heat a Darwin enclosure. His basking spot is on top of the heat panel and keeps a cozy temp despite being in a VERY cold room.
i would be concerned at the sharp bends in the cord, which over time may perish and burn through.

One point l forgot to mention after reading "Bluetongue1"s post is that the heat cord in my homemade heat panel is 80 watts as l found any less wasn't up to it and l live in Brisbane....solar 17 (Baden)
Heating from above seems to fight the laws of physics. In Newcastle 13 watts underneath is fine whereas you need 50 watts plus from above. This uses a lot more energy unecessarily!
 
Last edited by a moderator:
We made a heat panel using two thin tiles and a heat cord. The cord was the 25watt one and 3 metres long. we put one tile on the bottom then wound the heat back and forth make sure each loop has a wide bend not tight otherwise you will damage the cord we did this for the whole tile then put another tile on top and did three strips of heat proof tape to hold the tiles all together we then put it in the corner and plugged in perfect sits around 28 degrees and have a thermometer and thermostat pushed in the side just to make sure, it leaves a small gap of less then 1cm all the way around for excess heat to escape so wont overheat and catch fire. my snake loves it as we put a small square of marine carpet and then her hide on top. happy snake:D will post pics in a second.

Im planning on doing this with both my enclosures, but am also going to use substrate (sand) ontop, so not going to use a ventilation hole. But will be using a probe thermostat up against the tile to allow the tile to cool down when the temps are fine and a timer to switch off at night :)

Where do you get the heat tape from?
 
How well do the reptile radiators work? I'm trying to convince my bf that making my own 'mat' out of head cord and tiles would be a cheaper and most likely better option, but I've never seen anyone actually talk about the radiators.

And ditto with the heat tape :D
 
firedrake, radiators are awesome, i use them in heaps of enclosures and love them. (so do the snakes)

they are alot pricier than making ur own tho, and i cant compare the 2 since i havent made any myself,...im planning on trying a home made jobby tho, thanks to the many good ideas posted here!! ;)
 
Yeah he's happy to pay the extra for it, I just thought a heat cord would be more flexible in what I could do with it. Still have to get the heat and thermo so I guess I'll try the radiator first and see how it goes, maybe when I upgrade to a bigger enclosure I'll try the cord :D
 
the panels are pretty powerful, so better in bigger enclosures rather than smaller,..

i know you'll be using a thermostat, but in the event of a thermostat failure it would cook snakes in a small enclosure,...

if youre looking to use them in smaller enclosures look into the new lower wattage panels in the pro herps ad,....i'll be getting some of them to replace the panels in my smaller enclosures now that they are available,...

these cord ideas sound great tho, i reckon try one of them before getting a panel!!
 
I'm using it for a click clack to start with, do you think it would be too powerful? I'd get an actual heat mat but I don't want to end up cooking my baby, and from the stories I've heard they aren't very reliable :S
 
oh, def a cord for the click clack,.....i wouldnt recommend the radiators for anything smaller than 4x3x2 foot,....preferably 6x4x2.
 
Status
Not open for further replies.
Back
Top